Thursday 31 March 2011

Live, Laugh, Love Frame & Frame-Covering Tutorial


Finally I am posting the photos of the frame I was commissioned to make a couple of weeks back for my friends' daughter {bedroom decor for her birthday}.

I was provided with this "shadow-box" frame, which was nice & deep so there was lots of space for 3D embellishing.  I was also given the photos & the "sunflower" theme to work with.
I used some older papers by Doodlebug (for the frame) & Kelly Pannacci for Sandylion (the background print) as these were versatile papers with a good mix of colours that would hopefully "match everything!"

I have had those sunflowers in my stash forever & a day so finally put them to perfect use!  I was also given the scripture required but it was left up to me to decide how to print it up & with which font, etc...
I used strips of bling all around the scripture to make it stand out & a blue sunflower in the opposite corner to the others, with an American Crafts Sunflower badge in the centre, to re-inforce the theme.

I was fortunate enough to find a "joy" embellishment in my stash - to tie in with their family name.  The sunflower image is stamped & then coloured in & the entire frame is edged with Pink Paislee washi tape, directly on the glass, to hide the clips that hold the front glass to the frame {initially there was a wide cardboard mount supplied but I did away with this to allow more space for the layout beneath}.
I made the 2 frames that I then covered with printed paper & have a little tutorial on that below.

The font I used is called "Amaze".  It was quite tricky working with this sized "layout" which was bigger than a standard 12inch page but smaller than a double-pager.  I had to carefully paper-piece the printed paper together so that the joins were not obvious & so that the text was maximised & strategically placed.
I don't generally make things for other people unless they are gifts.  I find that non-crafty people have little concept of the time, effort & expense that goes into this kind of project.  My friend was of course very grateful though...

This is how the paper looked when it was all glued down to the backing board - there are 3 joins altogether there - can you spot them?
I bought a sheet of this board from a packaging wholesaler, who kindly cut it into 12inch squares for me, to make it simple for me to store with my papers.  It is 3D foamcore board & perfect for making frames, which are really simple, just measure & cut using a non-rotary trimmer so that you can turn the corner at a specific point.

Use your craft knife to cut out the centre section then slash into the corners on the inside of the frame, as illustrated, and slice diagonally across the outside corners, then fold & voila - there you have it!
If you don't have a Making Memories Craft Knife like mine you really need one - it's a must (and comes with stacks of spare blades too).  Just be careful - it's dangerous - once I dropped it into my foot & it stayed there!  I had to pull it out!  Gross!!!

I'm not one to worry about how things look "at the back" as long as they look perfect from the front!
If you want to try this out & don't have the 3D foamcore board you can use the back of a foolscap pad (the thick "chipboard" type cardboard that comes on the back of the exam pads the kids use for school).

My kids all know that as soon as they are finished with their foolscap paper pads they pass the backing cardboard on to me for my stash!
Once you have cut the printed paper you need to apply double-sided tape to the reverse side of the frame then neatly fold the paper backwards behind the frame & adhere.

Flip it over & you should have a perfectly covered frame ready to use on your next layout or off-the-page project!
****PLEASE LOOK HERE AT MY PREVIOUS POST CONTAINING MY RAK GIVE-AWAY****

I have decided to extend the deadline on this until Tuesday 5th of April to allow anyone who would like to enter to have a chance to leave a comment linking me up to a photo of their scrapspace (in an online gallery, old or new blogpost).

I will be back tomorrow to share some BIG NEWS (my final toot - tomorrow) as well as my layout for the very first sketch up at my new DT gig site - Once Upon a Sketch so do pop in again to take a look and please play along - we have some fantastic sponsors lined up for the future and FOUR prizes to give away in April!

Please forgive me if I owe you a bloggy visit - I have just come out of hospital & DH is insisting that I come to bed now so no blog-hopping for me tonight I'm afraid!  But I promise to do my best to visit you all soon!


Friday 25 March 2011

Beautiful Memories {Colour Combos Galore 185/Jenni Bowlin Sunday Star Sketch}


***plus tips & tricks on how to create your own personalised backing paper***

I forgot to mention that I won a voucher over at the new JBS Forum during their crop a couple of weeks ago with this layout!  So I'm thinking, seeing as I'll be using the voucher & paying the postage I may as well order all I need (cough, cough...) & get it all shipped together...so I'm on a little mission to wipe out the small amount of JBS stash that is still lurking on my paper trays...hence my choice of paper here!


I took a couple of photos along the way to show you some tricks.  To save paper I often cut out a window of cardstock if there is going to be another piece over it.  It also helps keep my pages "not too fat" which is a good thing for your albums too.
I would love to work with tape runners but they are not available here, however a great double-sided tape is, so I figure I can save on ordering those online.  I used to be foxed by circles though & cut lots of short pieces, but peeling the back off was a right pain, then I tried just turning the tape & kinda pleating as I went, and it works just fine!  Saves tons of time because you can just pull the tape off in one easy movement!

When I'm creating I get the base, or FOUNDATION of my page prepared, before I start adding the photos & other surface layers, etc.  
Above I started with a white cardstock base, layered the red print over. 
Added a big text rub-on along the top (I knew I wanted this so the rub-on went on first - to determine the position of the printed paper).  
Then I added the punched butterfly strip just under the rub-ons along the top, then the scalloped circle piece (cut some off the bottom once I had marked how much needed removing) then placed some yellow vellum underneath it.  
On top of the vellum I layered a printed scallop that I had hand-cut, inked  & mounted onto some cardstock.  On top of this I added a scallop sticker strip & then a straight sticker strip.  

So before even starting, my base page consists of 9 separate pieces/layers.  That is how I get the interest going sometimes ...creating my own customised backing paper.

 I combined the colour combo with this sketch from Jenni Bowlin. (see below)


I've been dying to use these photos so used two of them in place of the five in a row then one more in place of the big title space.

Instead of the top scallop strip I used a punched butterfly strip & I used the circular scallop paper instead of the rectangular one in the sketch.


I thought the large Lily Bee word/sentence rub-ons would make a good, light & unobtrusive substitute for journaling.
I found that Jenni Bowlin stash combined well with Glitz Design Love Nest here.
I used the vellum because I didn't have any cardstock quite the right shade of chartreuse & this was perfect!
I also liked how the vellum allowed the other layers to show through - see above left.


This is quite a busy page for me but I was trying this layered style on for size & really like how it turned out!
I hand-made this pennant banner using JB prints backed with the white cardstock that I saved by cutting the window out the back remember?!

I layered up the scallop at the bottom of the layout here quite a bit & strung the banner over it.
I find that changing my photos to black & white, or sepia (or a mix of both as I've done here - by adjusting the saturation levels) makes them much more flexible to work with, although I don't recommend it all the time - sometimes colour is wonderful.

Supplies:-
Bazzill cardstock - white 
Bazzill swiss-dot - yellow
Yellow vellum - stash
JBS 'Picnic Lunch' red print
JBS 'Naptime' yellow print 
JBS 'Saloon' brown print
Brown circular scalloped dotty paper - Collage Press "Rootbeer"
Butterfly punch & butcher's twine - Martha Stewart
Word/sentence rub-ons - Lily Bee "Laugh"
Dot rub-ons, transparencies x 2, "glitzers" frame stickers x 2, "Memories", striped, scalloped & "beautiful" sticker, plus "Be Yourself" & "Best Friends" sticker, big red & yellow rose die-cut and yellow teeny alphas - Glitz Design "Love Nest"
Red star (star banner stickers) , 'Vintage Style' buttons, stick pins, rhinestone button & Vintage black date numerals- Jenni Bowlin
White ruffle - My Mind's Eye Lost & Found
Yellow embroidery thread, lace & birdie badge - stash
Red scallop sticker - Crate Paper "Restoration"
Red straight border sticker - Cosmo Cricket "Circa 1934"
Yellow pearl & red bling flower- Prima
Yellow ink - Dewdrop Memento - Canteloupe

Happy weekend Creative people!


Thursday 24 March 2011

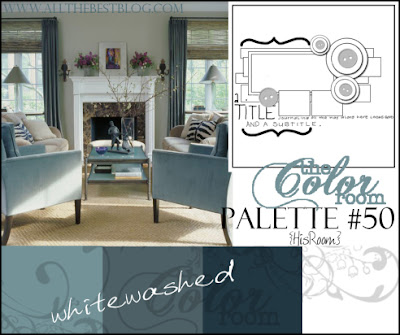
He's my no. 1 {The Colour Room Palette 50 /The Studio Challenges March 20th Sketch Challenge}


It was a public holiday here on Monday {Human Rights Day} & as a result I have been playing "catch-up" all week!  I keep thinking it's a day earlier than it really is & then realising that I had more to do on the day than I had originally thought!  Anyway, here is my take on this week's blue palette over at The Colour Room.

I used the latest sketch up at The Studio Challenges, which appealed in it's simplicity, and I thought the stripes would lend to the manly theme.

I was inspired by the striped background to use this striped paper from American Crafts {Blue Skies} and used the opportunity to try a technique I've seen around quite a bit lately - using masking tape & washi tape, just sticking & tearing it, overlapping & layering it slightly.


I placed a 1" strip down either side of the dark blue matt, but it looked too clompy, so I tore it (LOVE how it came out!) then used the other side of the torn strips (the halfs which I had torn off) & adhered them to the edge of the page on either side...pretty nifty I thought :)

There was a twist to the sketch challenge, and that was to use "ruffles" somewhere on your project.  I used the white crepe paper ruffle from my recent Studio Calico kit {My mind's Eye} and added the little "Fine & Dandy" bird from the MME bling packaging too.  The rosette is actually TWO Studio Calico rub-ons rubbed one over the other & the stitching is faux stitching using (one of my many as they take it in turns to be temperamental!) white gelpen {because I am still waiting for my sewing station to be built so to sew is a bit of a hassle right now as my studio is too small to fit my machine into}(to have it permanently set up). 

Thank you for looking & for all your kind comments on my recent posts.  

***See previous post for my BIRTHDAY RAK & please note that you do not have to do a new post on your scrap-space to qualify if you already have a photo of it anywhere on the internet, or a post about it along with a photo - just add the link to the comments section or e mail me a photo to be in to win!***

Supplies:-

Backing paper - American Crafts - Blue Skies (Peaceful Easy Feeling)
Dotty blue print - Bo Bunny (Ocean Dot)
Plain cardstock - Navy (Bazzill)
Arrows cut from Basic Grey Hopscotch (Sidewalk Chalk) Studio Calico
Colourmates (White photo matt)
White pen - Hybrid Gel Grip
Alphas & no's - Basic Grey & American Crafts "Remarks"
Journaling sticker (Studio Calico) by Crate Paper *exclusive to Candy Shoppe kit.
Buttons - My Mind's Eye - Lost & Found (Portobello Road - You & Me) Studio Calico January 2011
Rub-on rosettes x 2 - Studio Calico - Candy Shoppe
Birdie - My Mind's Eye Fine & Dandy packaging
Bling dot - My Mind's Eye - Fine & Dandy
Ruffle - My Mind's Eye - Lost  & Found - Madison Avenue "Happily Ever After"
Dymo type alphas - stash
Masking tape, washi tape - stash & Diana (Jamaica)

A page that looks simple to me but when I type out the supplies list it looks like there's everything but the kitchen sink on there!


Wednesday 23 March 2011

Toot Toot & a massive RAK!!!

Hi there creative friends!  I have something awesome to toot about today!  I have been invited by the uber-talented Nadia Cannizzo of Sydney, Australia, to join an absolutely awesome line up of international ladies on her brand new sketch/journaling blog  "Once Upon a Sketch".  Certainly something to toot about don't you think?!

You can read all about it here & play along for an absolutely awesome prize - a


 Irma Peredne - USA 
Lou Dahlstrom  - Australia 
Bente Fagerberg - Sweden
 Nerrida Mitchell - Australia 
Trudi Harrison - Australia 
LG Belarmino - Phillipinnes 
Helen Tilbury - South Africa 
Irini Liolia - Greece Rossella Palladino -Italy 
Heather Jacob - Australia 
Natalie Elphinstone- Australia

This is what Nadia has to say on the blog:-

Yoohoo!!!How very exciting that these absolutely talented ladies agreed to jump on board. Please visit their blogs and get to know them if you don't already...and notice that I have put their location next to their names? That's so you all know that this challenge blog will be open to anyone that wants to participate anywhere in the world. I have already had a few people asked me if they can take part in this as they do not live in Australia so to answer your question YES! You can! We will be working with sponsors that are from all over the place so we hope you do join us...

Speaking of sponsors...

Our very first one that is supporting us is My Scrapbook Nook and guess what you have a chance to win..????

Yep...this absolutely stunning March kit from the Nook is full of the latest Emma's Shoppe from Crate Paper, My Minds Eye Stella and Rose, Webster's Trim and American Crafts ribbons and thickers...You don't want to miss this...

So what do you need to do to be in the running for this?

Simple...help us spread the word that this challenge blog is alive.

Here is what you need to do...

**grab our badge from the side of this blog  and add it to your blog's sidebar

**post about our site and our giveaway on your blog with a link back to here and a photo of our badge and our prize

**make sure you are a follower and leave us a comment in this post to let us know you have done all of the above.

Remember this is open to anyone and you have one week, until the 30th of March. We will announce the winner on March 31st! 

How's that for wonderful news!!!???

But WAIT!  There's more!!  Another RAK!  This time right here on my blog!
I'm calling this one the BIRTHDAY RAK because my birthday is this month, on the 29th of March! 
To win my RAK you need to do 4 things:-
1.  Leave a comment on this post any time up to & including the 31st day of March 2011 midnight EST.
2.  Do a post on your blog about your scrapspace & how you organise your stuff in there (it needn't be long - it can just be one paragraph & have one photo)
3.  Leave ANOTHER comment here containing your link to that post so that I can check out your space!
4.  Oh, and of course, you need to become an official follower of my blog by joining my Followers' gadget on my sidebar & making sure your thumbnail picture appears.

Easy huh?!  
And now for the RAK.... 


That, my dear friends, is what 100 sheets of paper looks like!  ONE HUNDRED!!!  Just to say THANK YOU to you, and to the good Lord, for all my recent blessings & yours (and his) constant love, grace & providence in my life!

To be shipped ANYWHERE IN THE WORLD - to you or to a friend - in fact, to anyone, anywhere!!

Love & blessings XOXO


Woot Woot! Wait!!

Today was a great day!  After 5+ years of waiting this was finally ready for collection!  This may not mean a lot to many of you but for me, a Zimbabwean, it's like a "get out of jail free" pass - only it is hasn't been free - it's been a long, hard slog, but finally I have an identity slightly better than my previous one.  Sad & unjust that in Africa we should be so limited in our options & travels by our citizenship, when this is the continent of our birth, but such is the world...  


I was delighted to see that one of my recent layouts made "Pick of the week" at Scrapbook Challenges this week.  Remember that the Spring Fling Crop ends there tomorrow & there are some awesome prizes up for grabs so why not pop on over to the forum to see if there are any layouts you can whip up & unpload for a chance to win!  I entered the one below in the "Layered with an element of Green" challenge & love how all my green misting turned out & would never have done it had it not been for that challenge!


My Facebook friends may have heard me Wooting earlier in the day, but unfortunately I can woot no further!  I will resume the wooting in a few days (a week tops) so keep a look out here as there are a COUPLE of exciting bits of news I have to share with you!  Yup, all good things come in pairs!! {actually I just made that up...usually I'm lucky to get one good thing - today was just one of those rare days that will go down as highlights in my personal history :0) }

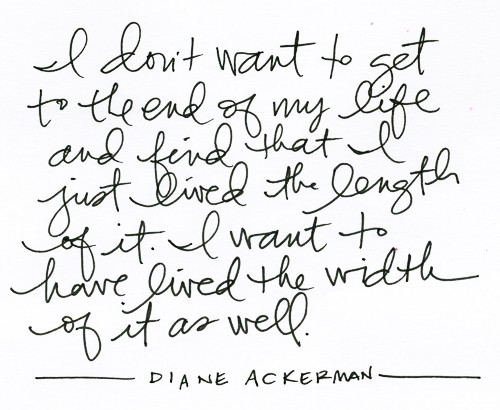
I do have an off-the-page project to share with you but am going to leave that for tomorrow because I don't have time to wait for it to upload now so I am leaving you with these inspirational quotes today instead.  I believe this top quote applies to our love of craft as well & I have been throwing myself into it this year in a "Truly, Madly, Deeply" kind of a way!


I love this one too - I know it may seem kinda corny but motivational stuff like this really keeps me going... There are times when I feel like just going to sleep....for weeks...when the exhaustion overwhelms me & I sit here at my keyboard & momentarily nod-off like we've all done in class at some time or other (or, dare we admit it, in church!) or when I really feel like I need a break, even from scrapbooking!  Yesterday was one such day.  My little girl begged me to take her to the mall for some special mummy & me time & I decided to take the afternoon off to spend with her. 

We had a beautiful time, had a lovely cuddle & fell asleep in the same bed. Then I woke up to my two pieces of great news this morning & finally collected my ID after 5 years of waiting {without which you can't even have your own bank account}.  I am a firm believer in good fortune coming to those who wait & one thing I have learnt as an African is to be patient.  And to persevere, and that nothing in life worth having is easily acquired.  And on that note - I am now off to bed!